Pi-hole with Nebula Sync Integration
Overview
In this project, I implemented a secure overlay network using Nebula to connect multiple Pi-hole instances across different devices and locations.
A standalone Pi-hole limited to the local network restricts remote access and centralized management. To solve this, Nebula creates an encrypted peer-to-peer mesh network that securely links all nodes as if they were on the same LAN.
Each Pi-hole becomes part of the Nebula network, enabling private communication, remote administration, and seamless synchronization without exposing services to the public internet.
This setup improves security, flexibility, and accessibility while maintaining a reliable and isolated DNS infrastructure.
Configuring Nebula Sync
Taking control over the secondary Pi
Before install the Nebula Sync on the Primary Raspberry Pi, it needs to take control over the second Raspberry Pi.
sudo pihole-FTL --config webserver.api.app_sudo true
sudo systemctl restart pihole-FTL
These commands give Nebula Sync control over the secondary Pi-hole through the API.

Downloading Nebula on primary Pi
Now you can install the Nebula Sync on the primary Raspberry Pi. The command list:
cd /tmp
URL=$(curl -s https://api.github.com/repos/lovelaze/nebula-sync/releases/latest | grep "browser_download_url.*linux_arm64.tar.gz" | cut -d '"' -f 4)
wget $URL
tar -xvf nebula-sync_*_linux_arm64.tar.gz
sudo mv nebula-sync /usr/local/bin/
sudo chmod +x /usr/local/bin/nebula-sync
rm nebula-sync_*_linux_arm64.tar.gz
Below I showcase how I did it on the terminal.


Make sure you are using Raspberry 3 or bellow otherwise the command might be a little more different.
Create Nebula Sync Config
List of commands:
mkdir -p /home/netserv/.config/nebula-sync
nano /home/netserv/.config/nebula-sync/nebula.env
Use your own user name of the primary Raspberry Pi.


Then put in the file neblua.env this code:
PRIMARY=http://192.168.0.11|pihole
REPLICAS=http://192.168.0.12|pihole
FULL_SYNC=true
RUN_GRAVITY=true
Change the two IP’s to the primary and secondary that you have. Also replace pihole with the passwords for both Raspberry Pi’s.
Create the Service File
Use sudo nano /etc/systemd/system/nebula-sync.service to create the file.
[Unit]
Description=Nebula Sync Service
After=network.target

[Service]
Type=oneshot
User=netserv
ExecStart=/usr/local/bin/nebula-sync run --env-file /home/netserv/.config/nebula-sync/nebula.env
Change netserv to your pihole user name
Create the Timer File
Use sudo nano /etc/systemd/system/nebula-sync.timer to create the file.
[Unit]
Description=Run Nebula Sync every 15 minutes

[Timer]
OnBootSec=2min
OnUnitActiveSec=15min

[Install]
WantedBy=timers.target
Use these two commands to activate the Nebula Sync automation.
sudo systemctl daemon-reload
sudo systemctl enable --now nebula-sync.timer


Setting up
There is only one command left:
sudo -u netserv /usr/local/bin/nebula-sync run --env-file /home/netserv/.config/nebula-sync/nebula.env
Replace the netserv twice with your own username.

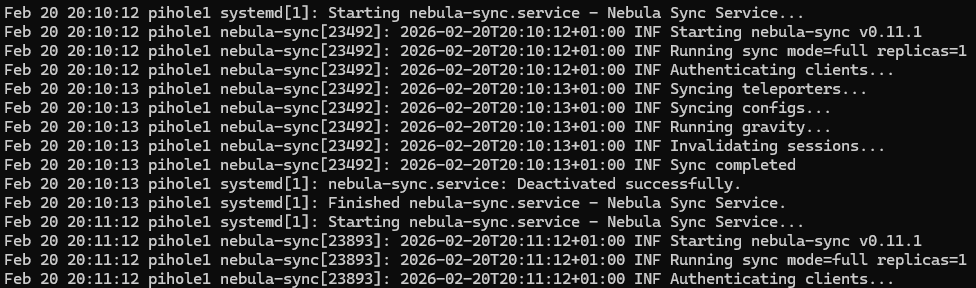
If you get this then the two Raspberry Pi’s are in sync with eachother.
To see the logs
Use the command journalctl -u nebula-sync.service
Problems I had with the configuration
Overall, the Nebula configuration process was relatively straightforward; however, synchronization with the secondary Pi-hole initially failed due to an authentication constraint, as passwords exceeding ten characters prevented successful syncing.

Also had the problem that for some reason in the sudo systemctl edit --full nebula-sync.service the file it was suppose to point out was /home/netserv/.config/nebula-sync/nebula.env instead of /home/pihole1/.config/nebula-sync/nebula.env, so I had to change that to not get the error and so that the two piholes could be in sync.
Demonstrating Sync between Pi-Holes
Limiting the memory that is used in logs
For a Raspberry Pi, these limits are beneficial because they prevent the SD card from filling up with excessive logs, which could otherwise lead to system instability or failures. By automatically rotating and deleting old logs, they also help reduce unnecessary write operations, extending the lifespan of the SD card. At the same time, the configuration ensures that recent logs remain available for troubleshooting and debugging, while protecting the system from runaway log generation caused by misconfigured or noisy services.
We are going to add limits via a drop-in.
sudo mkdir -p /etc/systemd/journald.conf.d
sudo nano /etc/systemd/journald.conf.d/00-limits.conf
Then put the limits in the file
[Unit]
Description=Run Nebula Sync every 15 minutes

[Timer]
OnBootSec=2min
OnUnitActiveSec=15min

[Install]
WantedBy=timers.target
Then restart with:
sudo systemctl restart systemd-journald

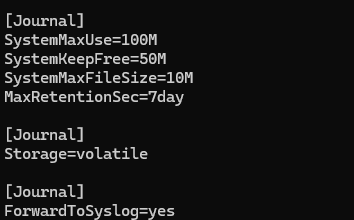
Use this command to verify that the limits are being followed.
systemd-analyze cat-config systemd/journald.conf | sed -n '/\[Journal\]/,/^\s*$/p'
Should look like this
To see how much space is used for the logs:
journalctl --disk-usage

Sources
Dual Pi-hole Setup for High Availability (with Nebula Sync): https://www.youtube.com/watch?v=XMtTwe60-VI