High Availability in Pi-Hole with keepalived
Table of Contents
Overview
In this project, I implemented high availability for my DNS infrastructure using two Pi-hole instances running on separate Raspberry Pi devices.
A single Pi-hole creates a single point of failure. If it goes offline, DNS resolution across the network stops working. To prevent this, I used Keepalived with VRRP to create a shared virtual IP address between both devices.
One Pi-hole acts as the master and handles all DNS traffic, while the second remains as a backup. If the master fails, the virtual IP automatically moves to the backup, ensuring uninterrupted DNS service.
This setup removes downtime and increases the reliability of my home network.

Keepalived provides a virtual IP that serves as a gateway for all participating hosts (in this case, the Pi-holes). One server is designated as active (master), while the others operate as passive (backup) nodes. Only the master handles incoming requests. The nodes continuously exchange health information; if the master becomes unavailable, a backup node automatically assumes the master role and continues serving traffic until the original master returns.
Equipment
2 Raspberry Pi’s with Pi-Hole installed
Configuring Keepalived

First thing is to install keepalived on both Pi-hole instances. We use the command sudo apt install keepalived to get keepalived on the raspberry pi’s.
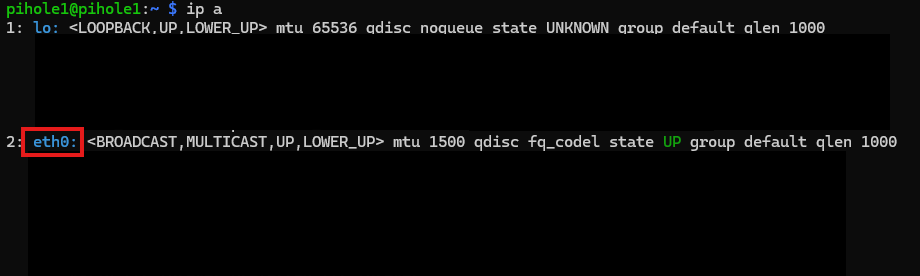
Next thing is to get the interface of the main pihole for this project, use the ip a command to get the name of the interface. This is going to be needed for our configuration file. My interface name is eth0.

After that we want to create a configuration file for keepalived on the directory /etc/keepalived/keepalived.conf. We will have to do that for both our instances (Pihole1 and Pihole2).
vrrp_instance VI_1 {
  state MASTER
  interface ens18
  virtual_router_id 55
  priority 150
  advert_int 1
  unicast_src_ip 192.168.30.31
  unicast_peer {
    192.168.30.32
  }

  authentication {
    auth_type PASS
    auth_pass C3P9K9gc
  }

  virtual_ipaddress {
    192.168.30.100/24
  }
}
Then enter this code on the file. Make sure to put the right unicast src ip and unicast peer. On the unicasr src you put the IP of the instance and on the other the IP of the other Pi-Hole. If you don’t know what the IP addresses are you can find them on the IPv4 configuration of your PC settings for DNS server or just search for them on the modem of your ISP provider. This is the code for the master.
vrrp_instance VI_1 {
  state BACKUP
  interface ens18
  virtual_router_id 55
  priority 100
  advert_int 1
  unicast_src_ip 192.168.30.32
  unicast_peer {
    192.168.30.31
  }

  authentication {
    auth_type PASS
    auth_pass C3P9K9gc
  }

  virtual_ipaddress {
    192.168.30.100/24
  }
}
This is the code for the backup.
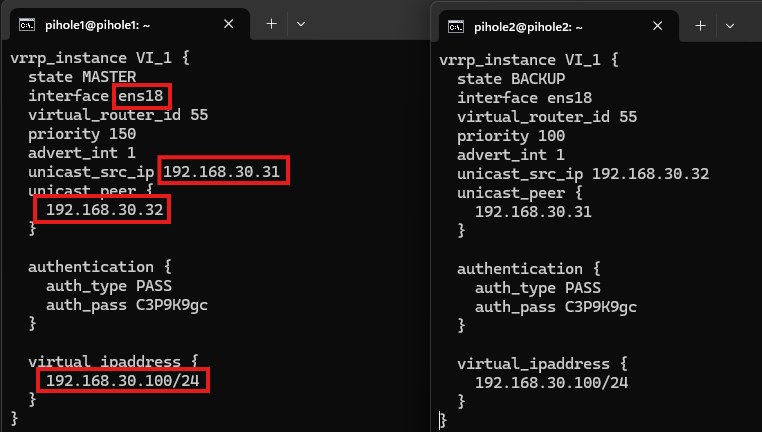
At the end it should look like this, pihole 1 taking the master script and pihole2 taking the backup. Change the interface to the one of your instance. Swap the IP addresses. Create your own password and username. Very importantly use an IP address that is not used by the ISP router already. Do the same for the backup just reverse the IP addresses.

Reboot now both instances.
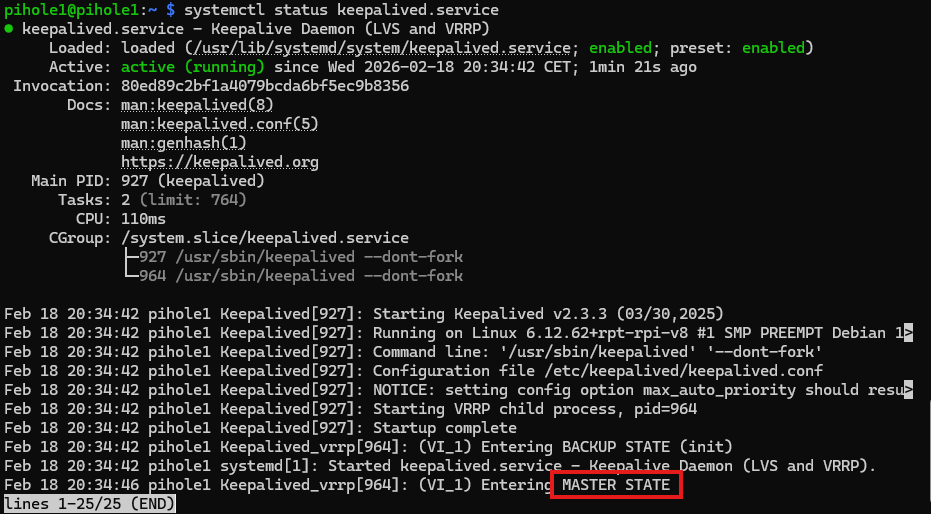
Try to find out if the keepalived service is active with command systemctl status keepalived.service. In this case it is active, running and entering the master state.
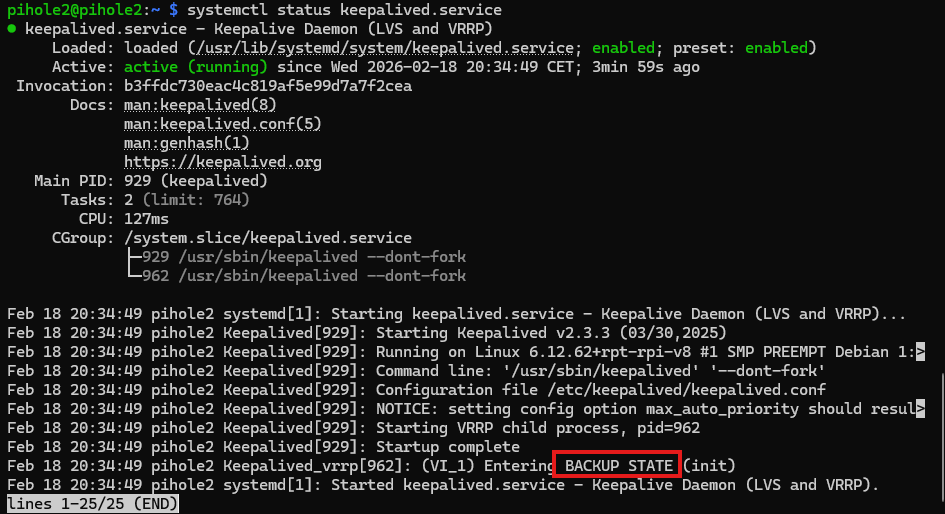
If you try the command on the right one you should that it is starting the service as the backup.
Here I demonstrate how the two raspberry pi’s are able to get from one moment to another to the master state if pihole1 is shutdown and what happens when it is back on the network.
Sources
Meet keepalived - High Availability and Load Balancing in One: https://www.youtube.com/watch?v=hPfk0qd4xEY&t=43s
The ULTIMATE Pi-hole Setup? (Pi-hole, Unbound, Nebula Sync, Keepalived): https://www.youtube.com/watch?v=6sznCZ7ttbI&t=801s