pfSense Lab Series - Part 2: Configuring Firewall
Limiting LAN Access to the Firewall
We are going to restrict LAN devices so that not all systems can access the firewall’s management interfaces or the internet. Allowing unrestricted access can introduce security risks, so it is best practice to limit the scope to only trusted hosts.

After installing pfSense, the LAN interface is configured with a set of default rules.
The first rule, known as the anti-lockout rule, allows LAN devices to access the pfSense WebGUI.
The second rule allows LAN devices full outbound access, including internet connectivity and access to other networks. The final rule enables unrestricted IPv6 traffic from the LAN.
To be able to restrict the acces to the LAN we have to create an Alias of trusted hosts that include the admins so that only they have access to the firewall gui.
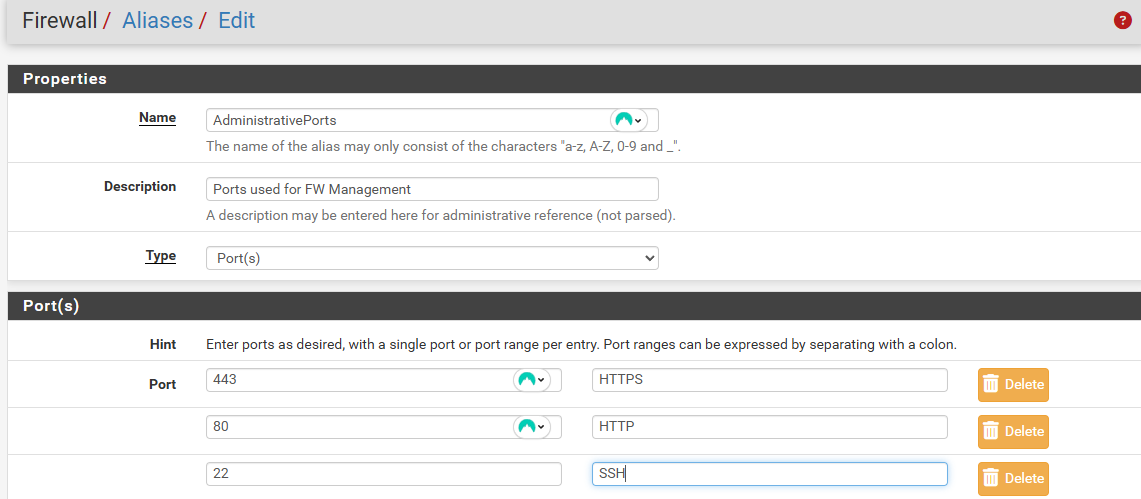

First under Aliases we define the three ports 443, 80 and 22 that are going to be used to manage the firewall.
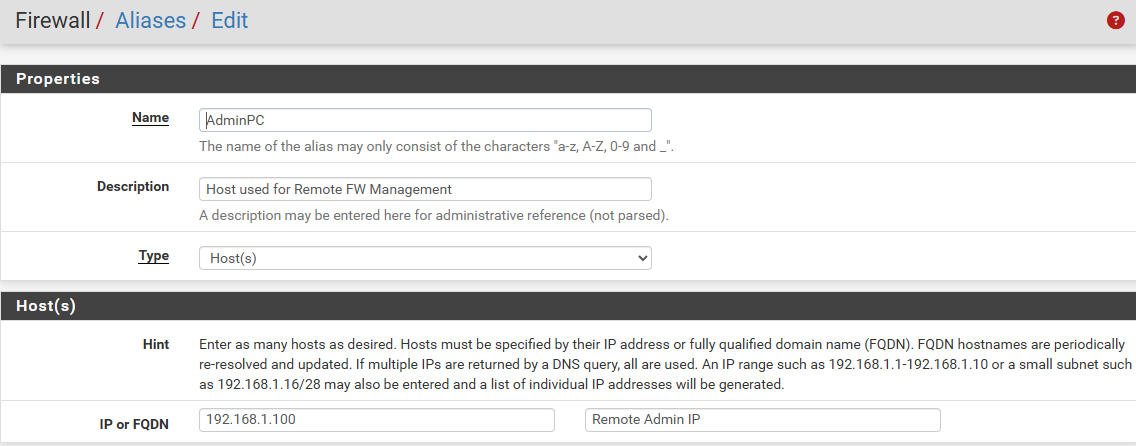

Than under IP you create the host and give its IP address that is going to manage remotely the FW.

Next, under Firewall Rules, create a rule that allows DNS traffic to the firewall. This rule permits all LAN subnets to send DNS requests to the firewall on port 53. Set the rule description to “Allow DNS.”

Now we actually create the rule for admin access to the LAN address (firewall gui) with the protocol TCP and chosing as source our alias AdminPC and AdministrativePorts.
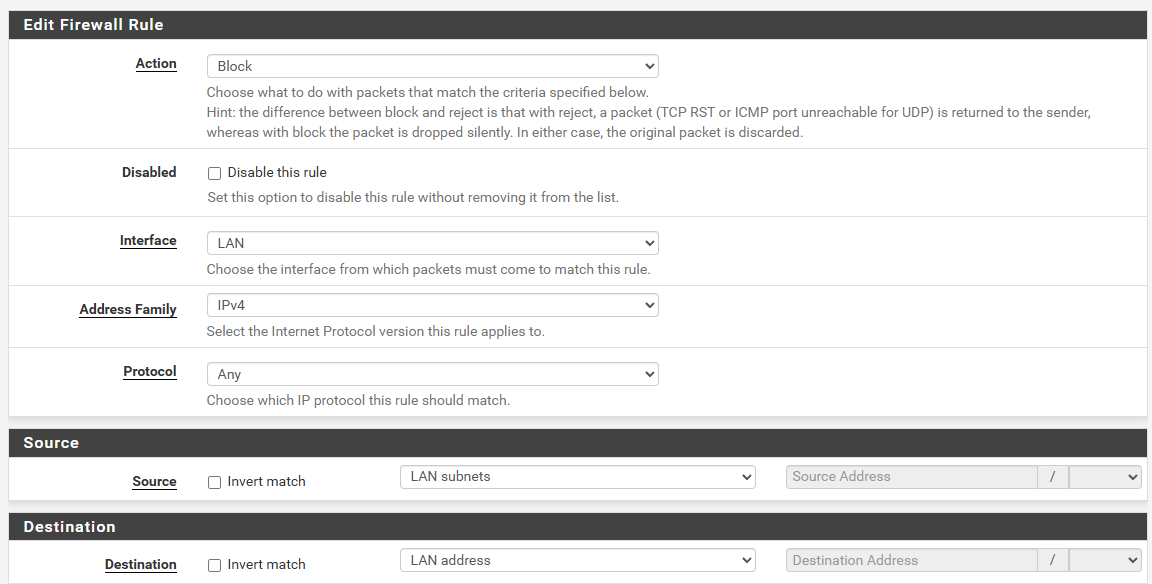
Next, create a new firewall rule to block access to the firewall from the LAN. Set the action to Block, the source to LAN subnets, and the destination to LAN address, as this is the interface we want to protect from unauthorized access.
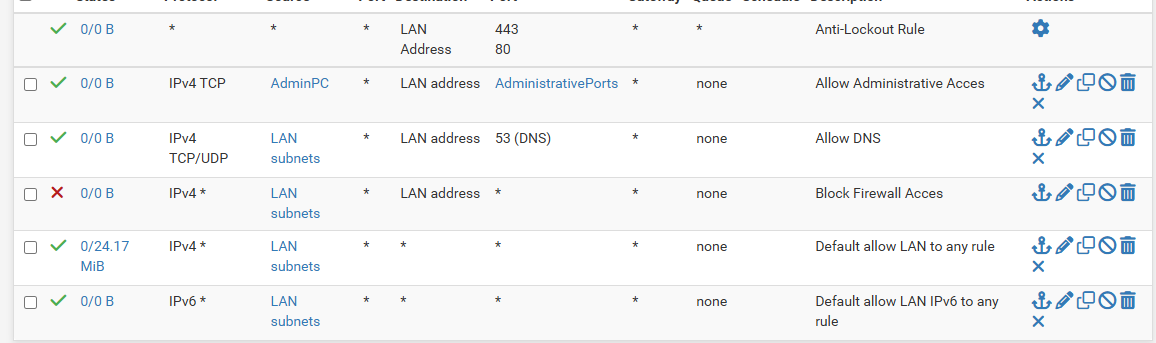
Drag the block rule under the Allow DNS rule. Click on save and apply the changes.
Under System > Advanced > Admin Access you can disable the anti lock rule.

Click on the box and save it at the bottom of the page.
Testing the new Firewall Rules

I put a second client to see if only my ubuntu with the admin IP (192.168.1.1) could access the firewall.
As you can see the rules were successful, the admin IP or client 1 was able to gain access to the firewall gui while the second client with the IP 192.168.1.101 wasn’t able to reach it.
Configuring a Static IP for Administrative Use
To ensure the IP address for the AdminPC alias on the firewall LAN remains unchanged, we will assign a static IP outside the DHCP range.

First thing is to go to Services/DHCP server and find out what range of IP addresses we can to assign to users. We are going to chose 192.168.1.99, as the IP address for our AdminPC alias.

To assign the new IP address, go to Firewall → Aliases in the firewall settings. Click on edit the AdminPC alias.

Do the same under Status/DHCP Leases.

At the end the static IP address should show up on the Services/DHCP server at the bottom.
VPN (WireGuard) Configuration
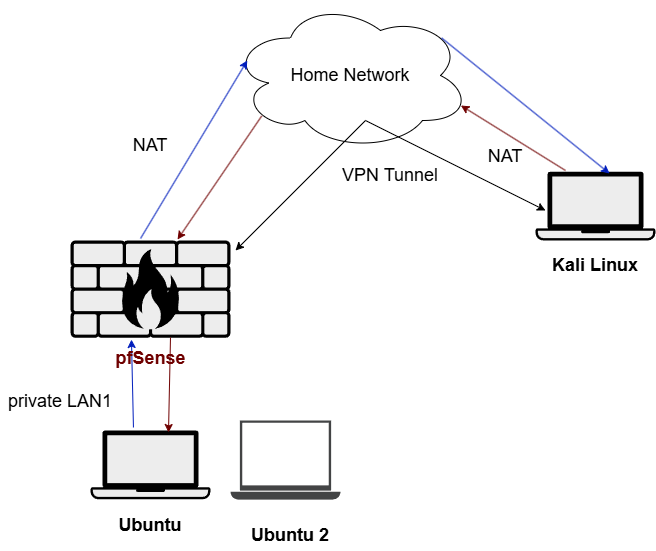
Next step is to create a full VPN tunnel with wireguard so the kali linux can acces the local network.
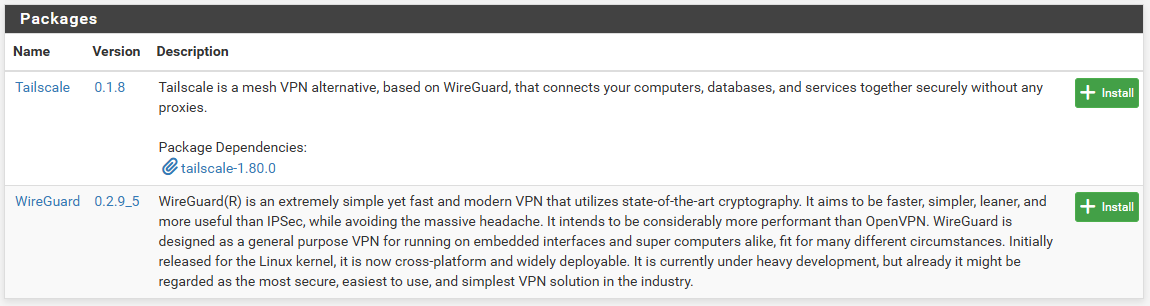
First we have to install WireGuard on pfsense, for that go to the pfsense gui, click on System/Package Manager. Install the WireGuard.

Now you should see under Firewall/Rules a new item on the navigation bar called WireGuard.
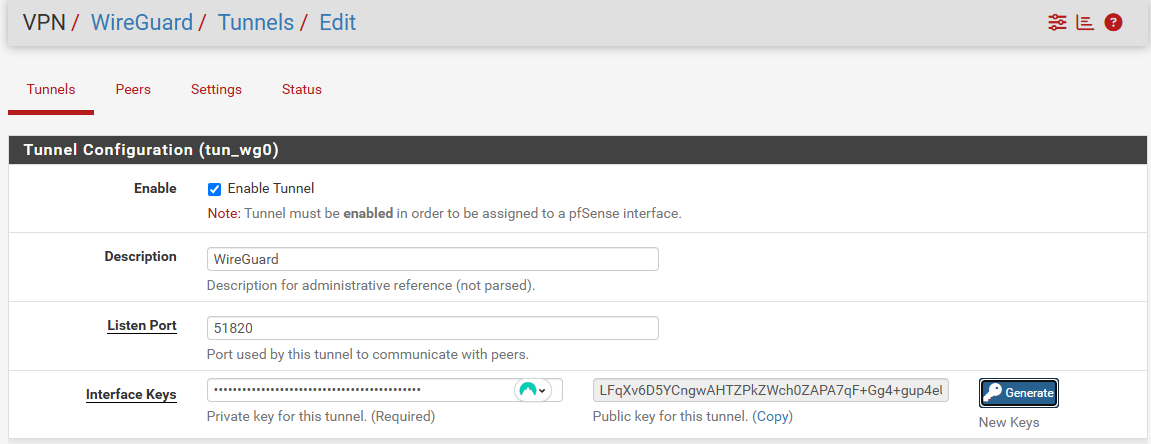

Then go to VPN/WireGuard/Tunnels and create a new tunnel. Select your port and generate a public/private key.

Last thing is to ensure that WireGuard is enabled, so on the navigation bar go to settings and select enable if it isn’t. Next step is to create a new Interface for the tunnel.

When selecting the tunnel and adding him it usually should get the name OPT1. Click the OPT1 to configure it.

We have to enable it first, then add a static IP, mine is 10.200.0.1/24. Save and apply changes.


Then go to Firewall/Rules, add a new rule. The only thing to change would be protocol to any. We add this rule to allow all traffic from the WireGuard tunnel. When the VPN tunnel is tested successfully and we can trust the VPN then we are going to tighten the any -> any rules.


Now we have to go to the WAN interface to allow access from the WireGuard outside the local network. We therefore create a new rule. Change the protocol to UDP and the port 51820 for from and to. This is going to ensure that port 51820 is allowed outside the local network,
Configuring WireGuard Client on Kali

Install WireGuard with sudo apt install wireguard.
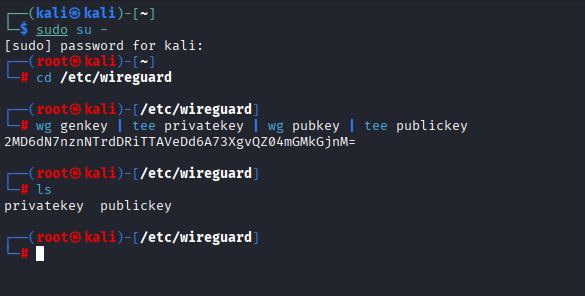
Now go to root with sudo su -, then go to cd /etc/wireguard and put the command on the picture and you should get a private and public key.

Do cat priavetkey to collect the private key, you will need to configure the wireguard client. Do the same for public key.
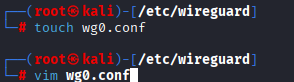
Use touch to create a new file called wg0.conf, and then edit the file.
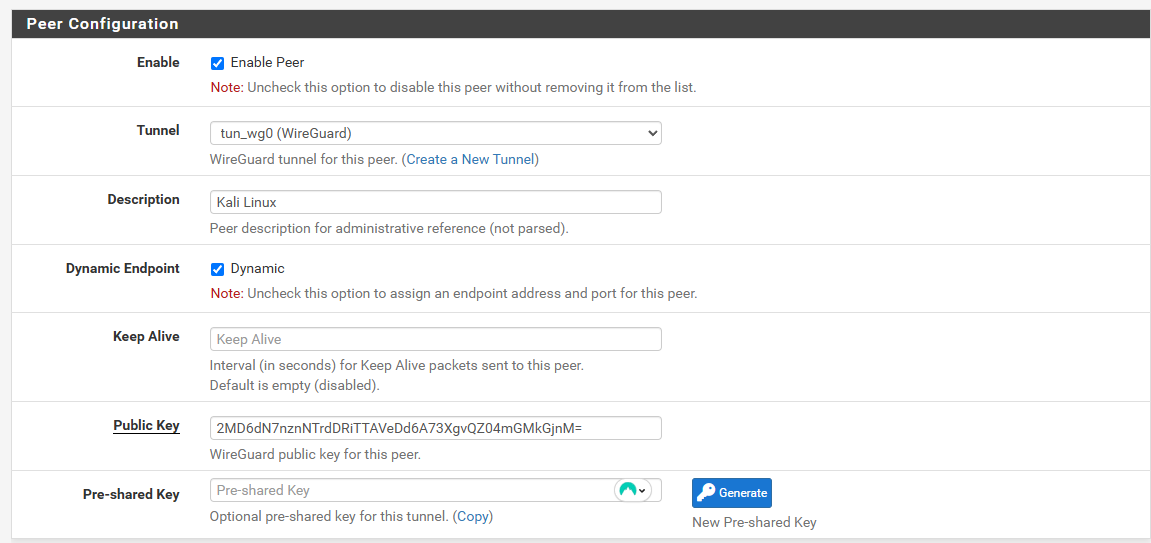
On pfSense WireGuard create a new peer. Use the tunnel we had created, then give a description of the pc you are using and put the public key generated on the kali linux on the public key tab.


At the end very impartant, put an IP address of the right range that we set previously, in this case mine is 10.200.0.5.

[Interface]
### PrivateKey_of_the_Client
PrivateKey =
### IP VPN for the Client
Address =
### DNS Server
DNS = 8.8.8.8, 8.8.4.4

[Peer]
###Public of the WireGuard VPN Server
PublicKey =

### IP and Port of the WireGuard VPN Server
##### Syntax: IP_of_the_server:Port
Endpoint =

### Allow all traffic
AllowedIPs = 0.0.0.0/0
Insert this information on the kali linux vpn client file so it is able to connect to the vpn server on the pfsense.
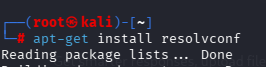
Before seeing if the interface is configured and running install this package.
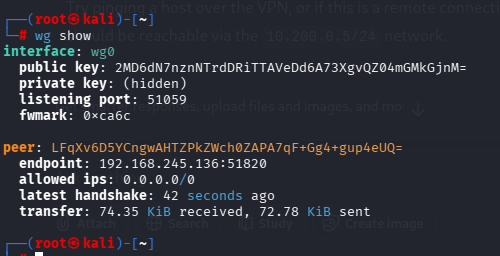
wg-quick up with the conf file that was created and then wg show to see if wg is up and running. And as you can see the WireGuard Server is listed as a peer in the wireguard client. Do the command at the end wg-quick save wg0.

As you can see the ping shows that the client is connected through the tunnel to the vpn server.
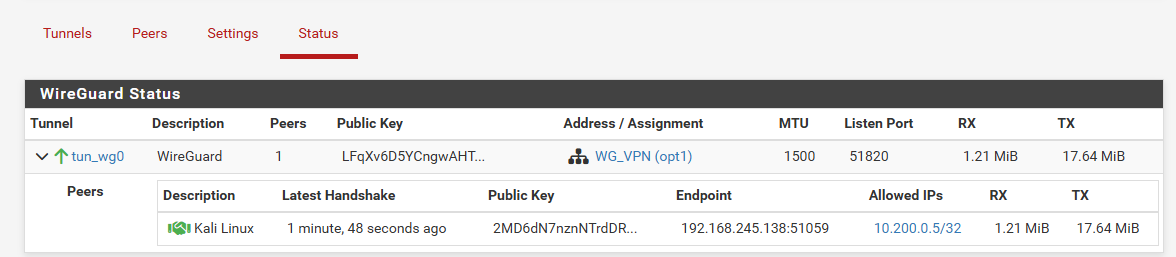
And here demonstated the connection with the client on the pfSense wireguard/status.
Potential Problems with PFSense
One potential problem is when using the host pc with wireguard. Could be that the IP address given to the VM PFSense can change. In that case go to the configuration of the wireguard app on windows 11 and put the right IP address.
Sources
Example of wg0 file: https://totatca.com/ttc14/
How to configure WireGuard on Kali Linux: https://www.youtube.com/watch?v=RT8drPYW4qs
How to configure WireGuard on Windows: https://www.youtube.com/watch?v=MZf2rOnQ4jc&t=50s
COMPLETE WireGuard on PFsense 2.7 Setup: https://www.youtube.com/watch?v=IvGjWndvTk0
Firewall configuration: https://www.youtube.com/watch?v=8jQ5UE_7xds&t=277s