Raspberry Pi Router
Simple summary of the items used for the project
NEWFAST 5400 Mbps USB WLAN Stick
Raspberry Pi 4 Model B (4GB)
GeeekPi Argon One V2 Raspberry Pi 4 Aluminium Case with Fan
Bruphny 5.1V 3A USB-C Power Supply for Raspberry Pi 4
Nimaso USB-C (Female) to Micro-USB (Male) Adapter – 4-Pack
Simulatneous 4-in1 Memory Card Reader
Atheros UB91C
Software used
OpenWrt OS: https://openwrt.org/toh/raspberry_pi_foundation/raspberry_pi
Raspberry Pi: https://www.raspberrypi.com/software/
Turning a Raspberry Pi Into a Mobile Router: The Concept Explained
The purpose of this project is to improve personal security when using public Wi-Fi networks—such as those in hotels—which can be easily compromised by attackers. While it’s possible to install and configure a VPN on each device individually, using a router running OpenWrt with a WireGuard VPN provides a far more secure, consistent, and convenient solution. By routing all traffic through a single, hardened device, you ensure that every connected device—whether or not it can run a VPN app—receives full protection. This approach also prevents hotels from fingerprinting or tracking individual devices, avoids connection limits, and reduces the risk of attacks on unprotected devices. With OpenWrt’s advanced firewall controls and WireGuard’s fast, reliable encryption, the router creates a private, isolated network bubble that shields all your devices from the vulnerabilities of public Wi-Fi.
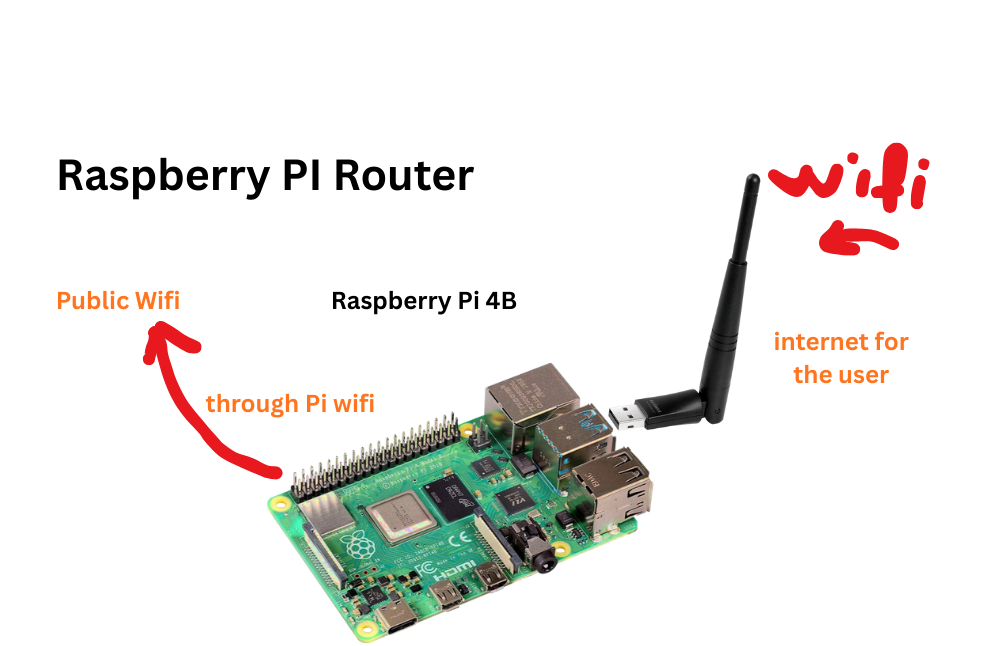
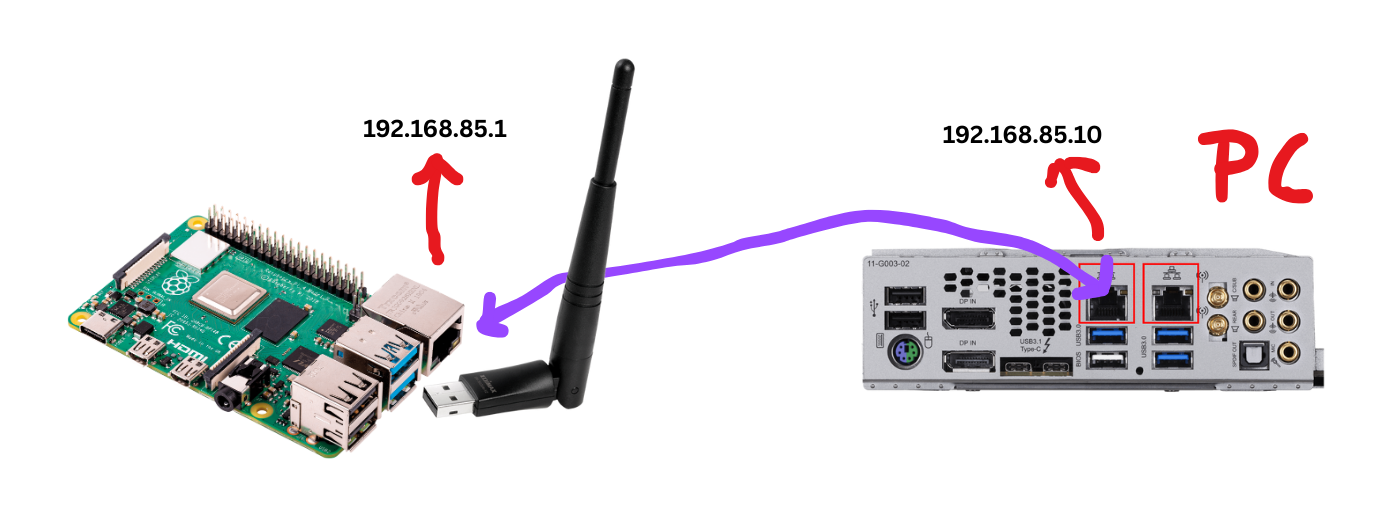
This setup uses the Raspberry Pi’s Wi-Fi adapter to connect to the public network, then routes that connection through a physical network adapter to create a secure, private router for your devices. This allows all connected devices to benefit from the Pi’s protected connection, as shown in the image.
Setup
The first step is to install the OpenWrt operating system on your Raspberry Pi. For this project, I’m using the OpenWrt 24.10.4 image, available at the official firmware selector: https://firmware-selector.openwrt.org/?version=24.10.4. Specifically, I chose the image for the Raspberry Pi 4B/400/CM4 (64bit).
Using a Simultaneous 4-in-1 Memory Card Reader, write the OpenWrt image to the Raspberry Pi’s microSD card. The Raspberry Pi Imager is recommended for this step, as it provides a simple and reliable way to flash the image.
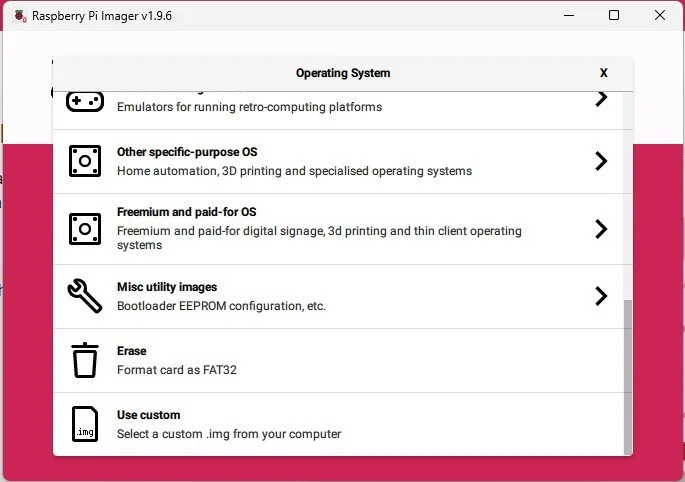
Select “Use custom” in Raspberry Pi Imager, since OpenWrt is not an official Raspberry Pi image. Choose the downloaded OpenWrt image file, then select the correct memory card from the storage list. In the Edit settings, configure a hostname and password for your router, and make sure to select “No clear settings”, as this option isn’t needed for OpenWrt.
After that insert the flash drive into the raspberry pi and than connected the computer with raspberry pi via the ethernet cable.
Configuring Your PC’s Network Settings
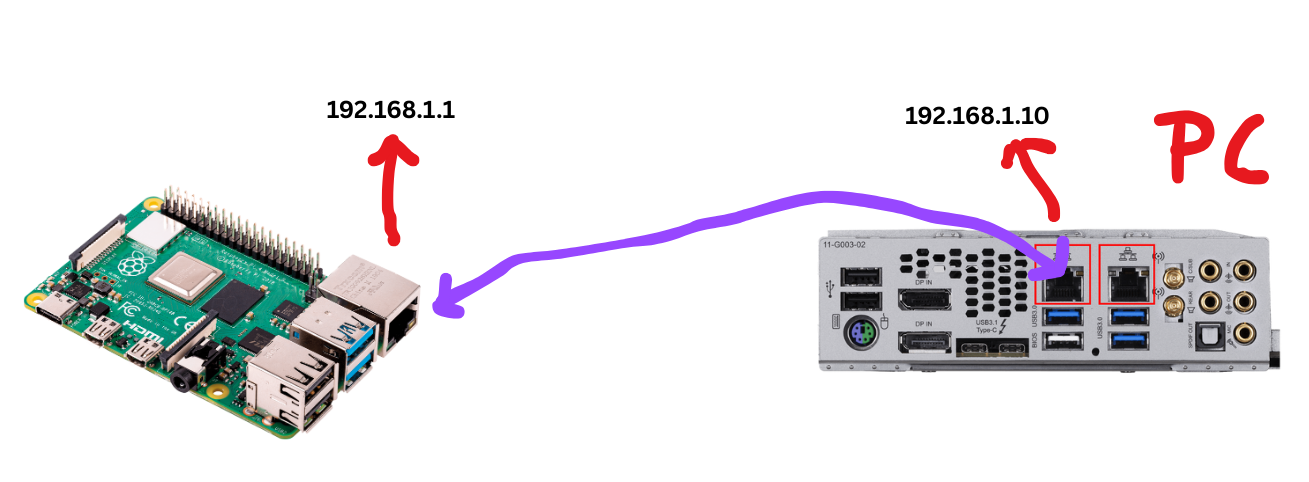
To access the Raspberry Pi router, connect your PC to the Pi using an Ethernet cable—one end plugged into the router’s Ethernet port and the other into your computer. By default, the router uses the IP address 192.168.1.1. To communicate with it, configure your PC’s network settings to use the IP address 192.168.1.10, placing it in the same subnet. Finally, set the router’s IP address (192.168.1.1) as the gateway in your IPv4 configuration.
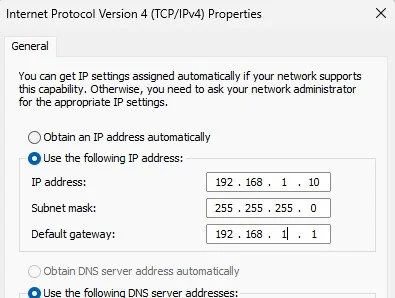
Open your IPv4 configuration settings and adjust them to match the values shown in the image above. This ensures your PC is on the same subnet as the router; otherwise, it won’t be able to communicate with the router for direct configuration.
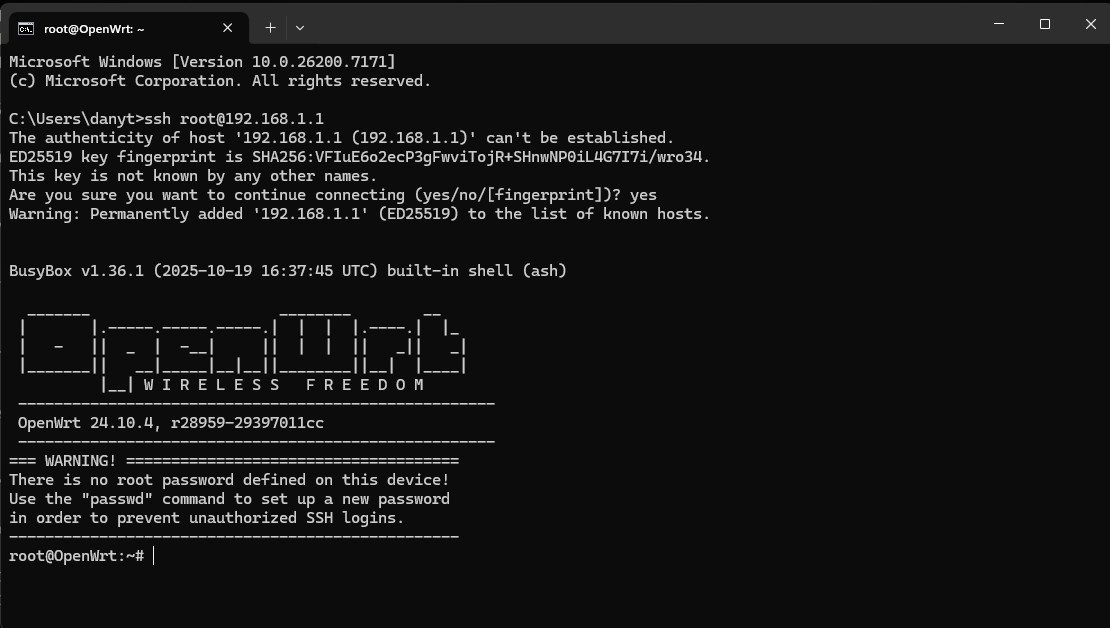
To access the router, open the Windows Command Prompt and run:
ssh root@192.168.1.1Once connected, use the passwd command to set a secure password for your OpenWrt router.
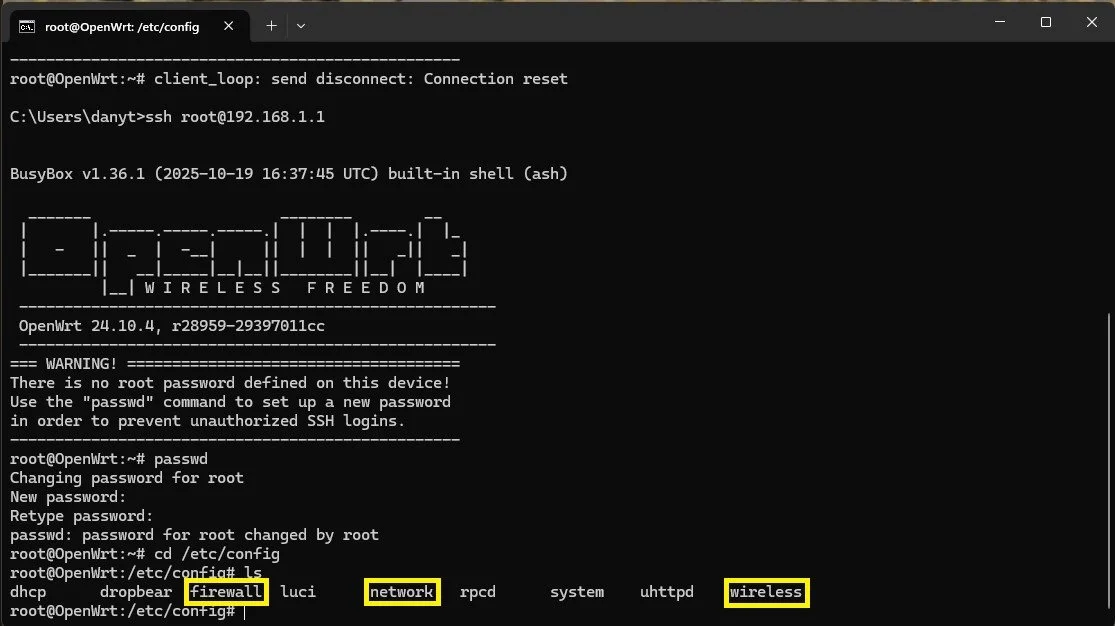
Then navigate to the configuration directory with:
cd /etc/configCreate backups of the network, wireless, and firewall files before editing them. This ensures you can easily restore the originals if anything goes wrong while making changes.

On the image above you can see the three files backed up with the commands:
cp firewall firewall.bk
cp network network.bk
cp wireless wireless.bk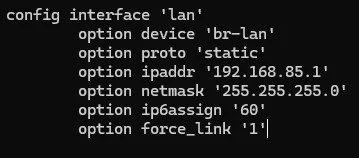
Editing the Network Configuration on OpenWRT
After the backups we want to edit the network file with:
vi networkSince 192.168.1.1 is one of the most common default router IP addresses, it’s best to change it right away—such as to 192.168.85.1 or any other private IP address. At the bottom of the configuration, add option force_link ‘1‘ to ensure the interface remains active and retains its settings regardless of whether the Raspberry Pi is powered on or off.
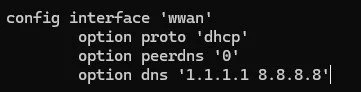
Below the interface ‘lan‘ we write a new interface called ‘wwan‘ with:
config interface 'wwan'
        option proto 'dhcp'
        option peerdns '0'
        option dns '1.1.1.1 8.8.8.8'
We do this so the router can obtain an IP address from the DHCP server of any public wireless network we connect to. Finally, configure the DNS server you want the wwan interface to use.

Adjusting Firewall Settings
Then we edit the firewall file with:
vi firewallWe only change one thing, the option input to ACCEPT instead of REJECT otherwise you won’t be able to communicate with the raspberry pi anymore. Then lastly use reboot on the command line.

After the reboot, you’ll need to use the new router IP address specified in the network configuration file to reconnect to the router. Make sure to update your PC’s IPv4 settings accordingly so they match the new subnet and gateway.
Once the router is configured, the next step is to set up the Wi-Fi adapter. This adapter will provide the wireless network that your devices will connect to in order to access the internet through the router.
Now we need to change the wireless file to be able to broad cast the wifi signal to other devices that want to connect to the router.
Navigate back to /etc/config, then open the wireless configuration with:
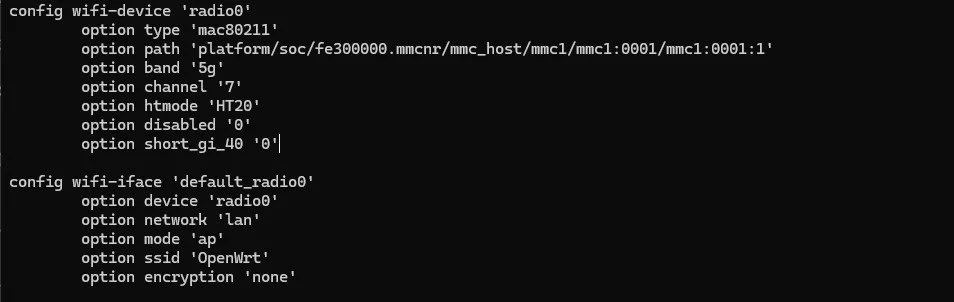
vi wirelessApply all the changes shown in the image above. Once finished, go up two directories by running cd .. twice. Finally, apply the configuration with:
uci commit wireless
wifi
If no interfaces appear as disabled, the configuration was successful.
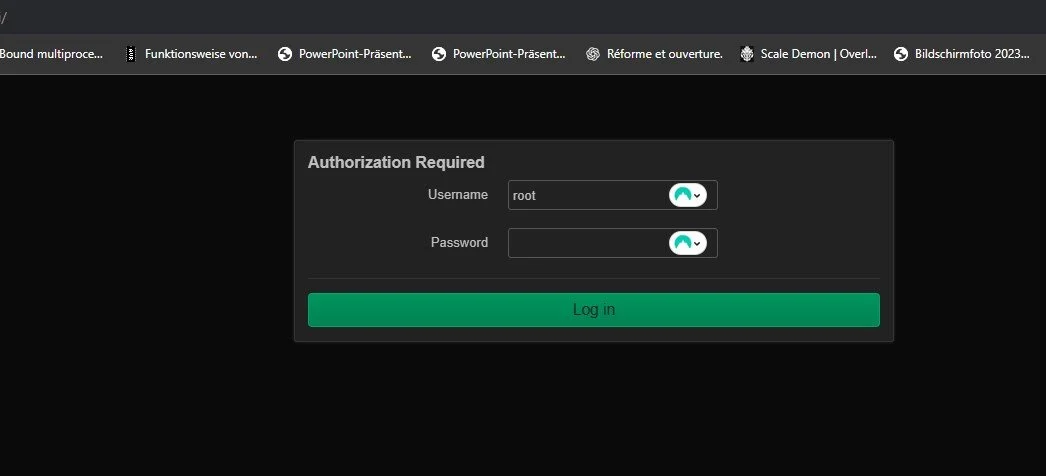
Log into your router through a webbrowser with your router IP address and its passowrd. Go to Network=>Wireless.
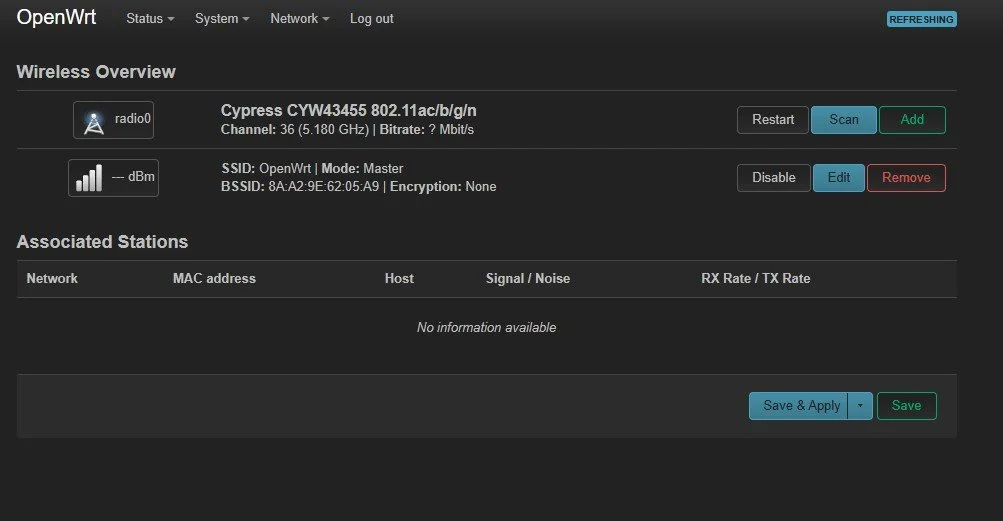
You should come up to this window. It should show the wireless interface that you enabled and the SSID it is broadcasting out. Click on Scan to see all wireless networks.
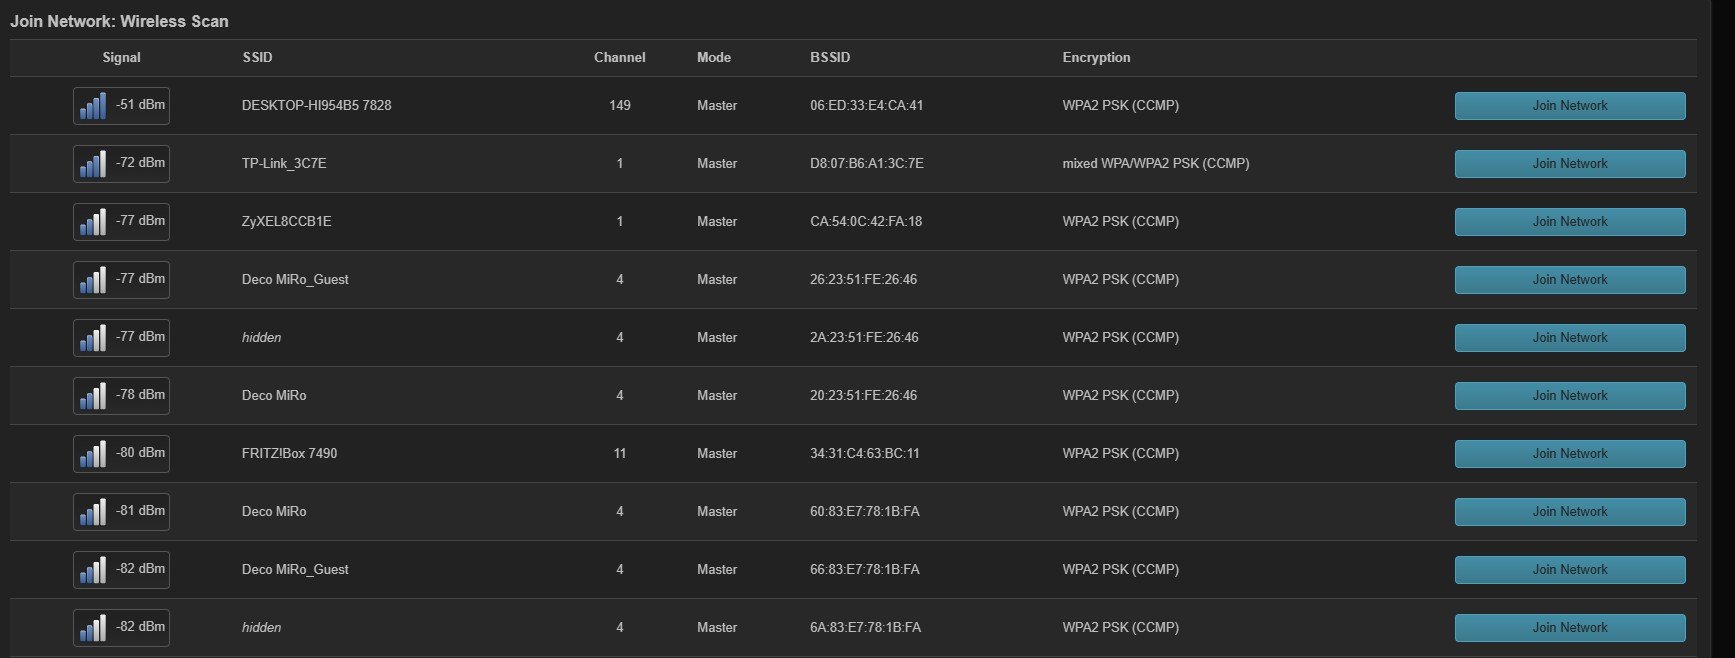
Then select the network for the router to gain access to the internet.
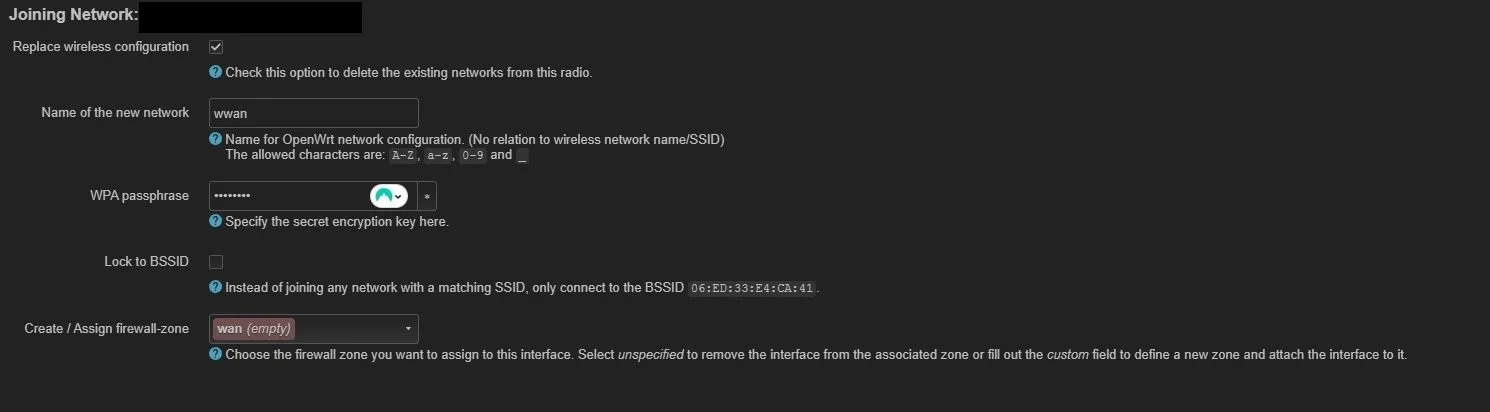
Select Replace wireless configuration then put the wifi password and click on ‘Submit’. Then ’Save’. Lastly ‘Save & Apply'.
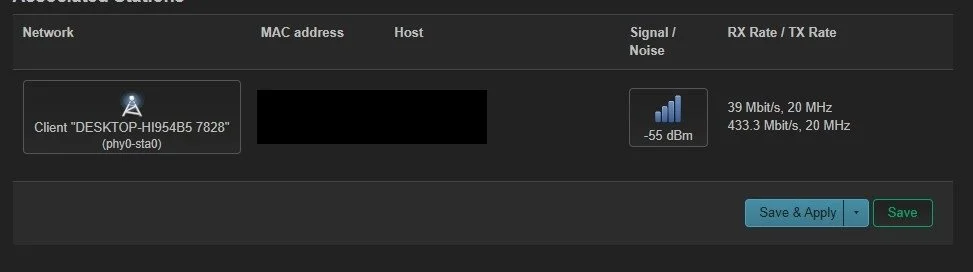
If the router is connected to the wifi it should look something like this.

If you want to check your internet connection, try pinging google.com to see whether you get a response.
Configuring Wireless Settings
Now before we can use the wifi adapter to be able to plug in devices, we have to update on the OpenWrt the drivers.

To update the drivers use:
opkg updateIf it doesn’t download the first time, try to reboot and try the command again. In the next command should be a driver that could be used for the wifi adapter:
opkg install kmod-rt2800-lib kmod-rt2800-usb kmod-rt2x00-lib kmod-rt2x00-usb kmod-usb-core kmod-usb-uhci kmod-usb-ohci kmod-usb2 usbutils openvpn-openssl luci-app-openvpn nano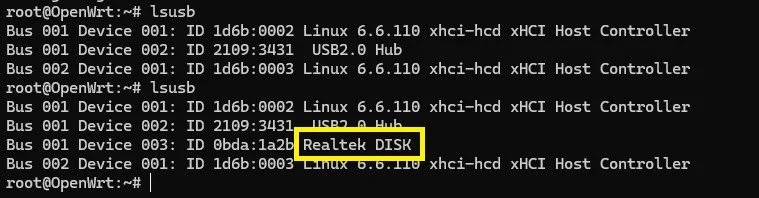
When you run the lsusb command and then plug in the adapter, you should see a fourth device appear, indicating that it’s connected to the router. If the adapter shows up only as a storage device—like in the example above with the NEWFAST 5400 Mbps—that means OpenWrt isn’t able to load the driver for that adapter. As a result, the wireless interface won’t be available for use.
The first adapter I tried wasn’t compatible with OpenWrt; it required Windows drivers to function. Because of that, I had to switch to another option: the Atheros UB91C, which is properly supported. I had to opkg install kmod-ath9k-htc ath9k-htc-firmware this too to be able to identify the adapter.

The second one as you can see is very different, openwrt is able to identify the adapter as a wireless device instead of a storage stick.

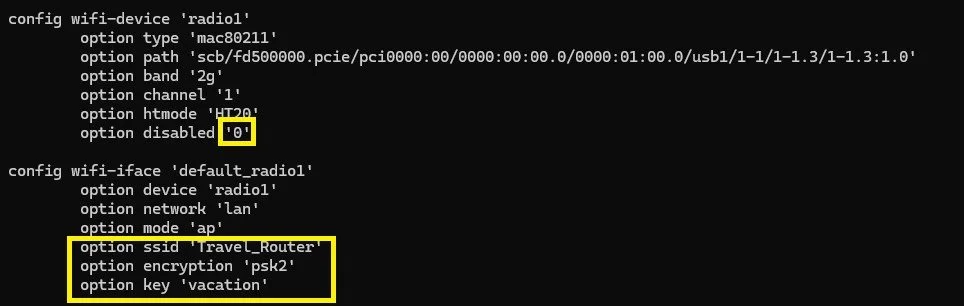
Then enable radio1 by replacing the 1 with a 0. Put a new name for your SSID, mine is Travel_Router, you should use encryption, so write psk2 instead of none, and add at in the last line the key that is going to be used for the wireless password. Mine is vacation but I’m going to change it later.
At the end commit your new configuration with:
uci commit wirelesswifi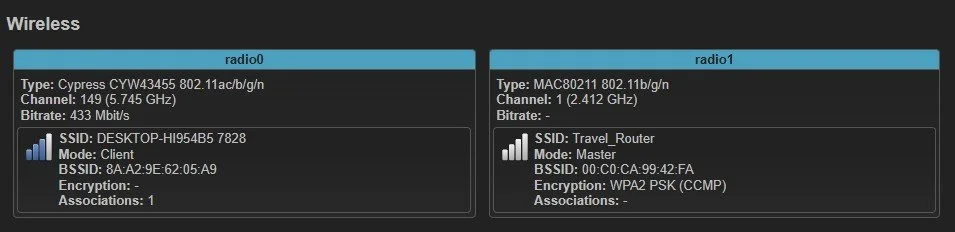
Testing Device Connectivity
Now you should have two radios one for getting wifi of the hotel for instance and the second radio, radio1 is going to be used to connect our devices to the internet throught the router.

You should be able to connect your devices to the router, through the access point two of my phones both an android and iphone are able to get acess to the internet.
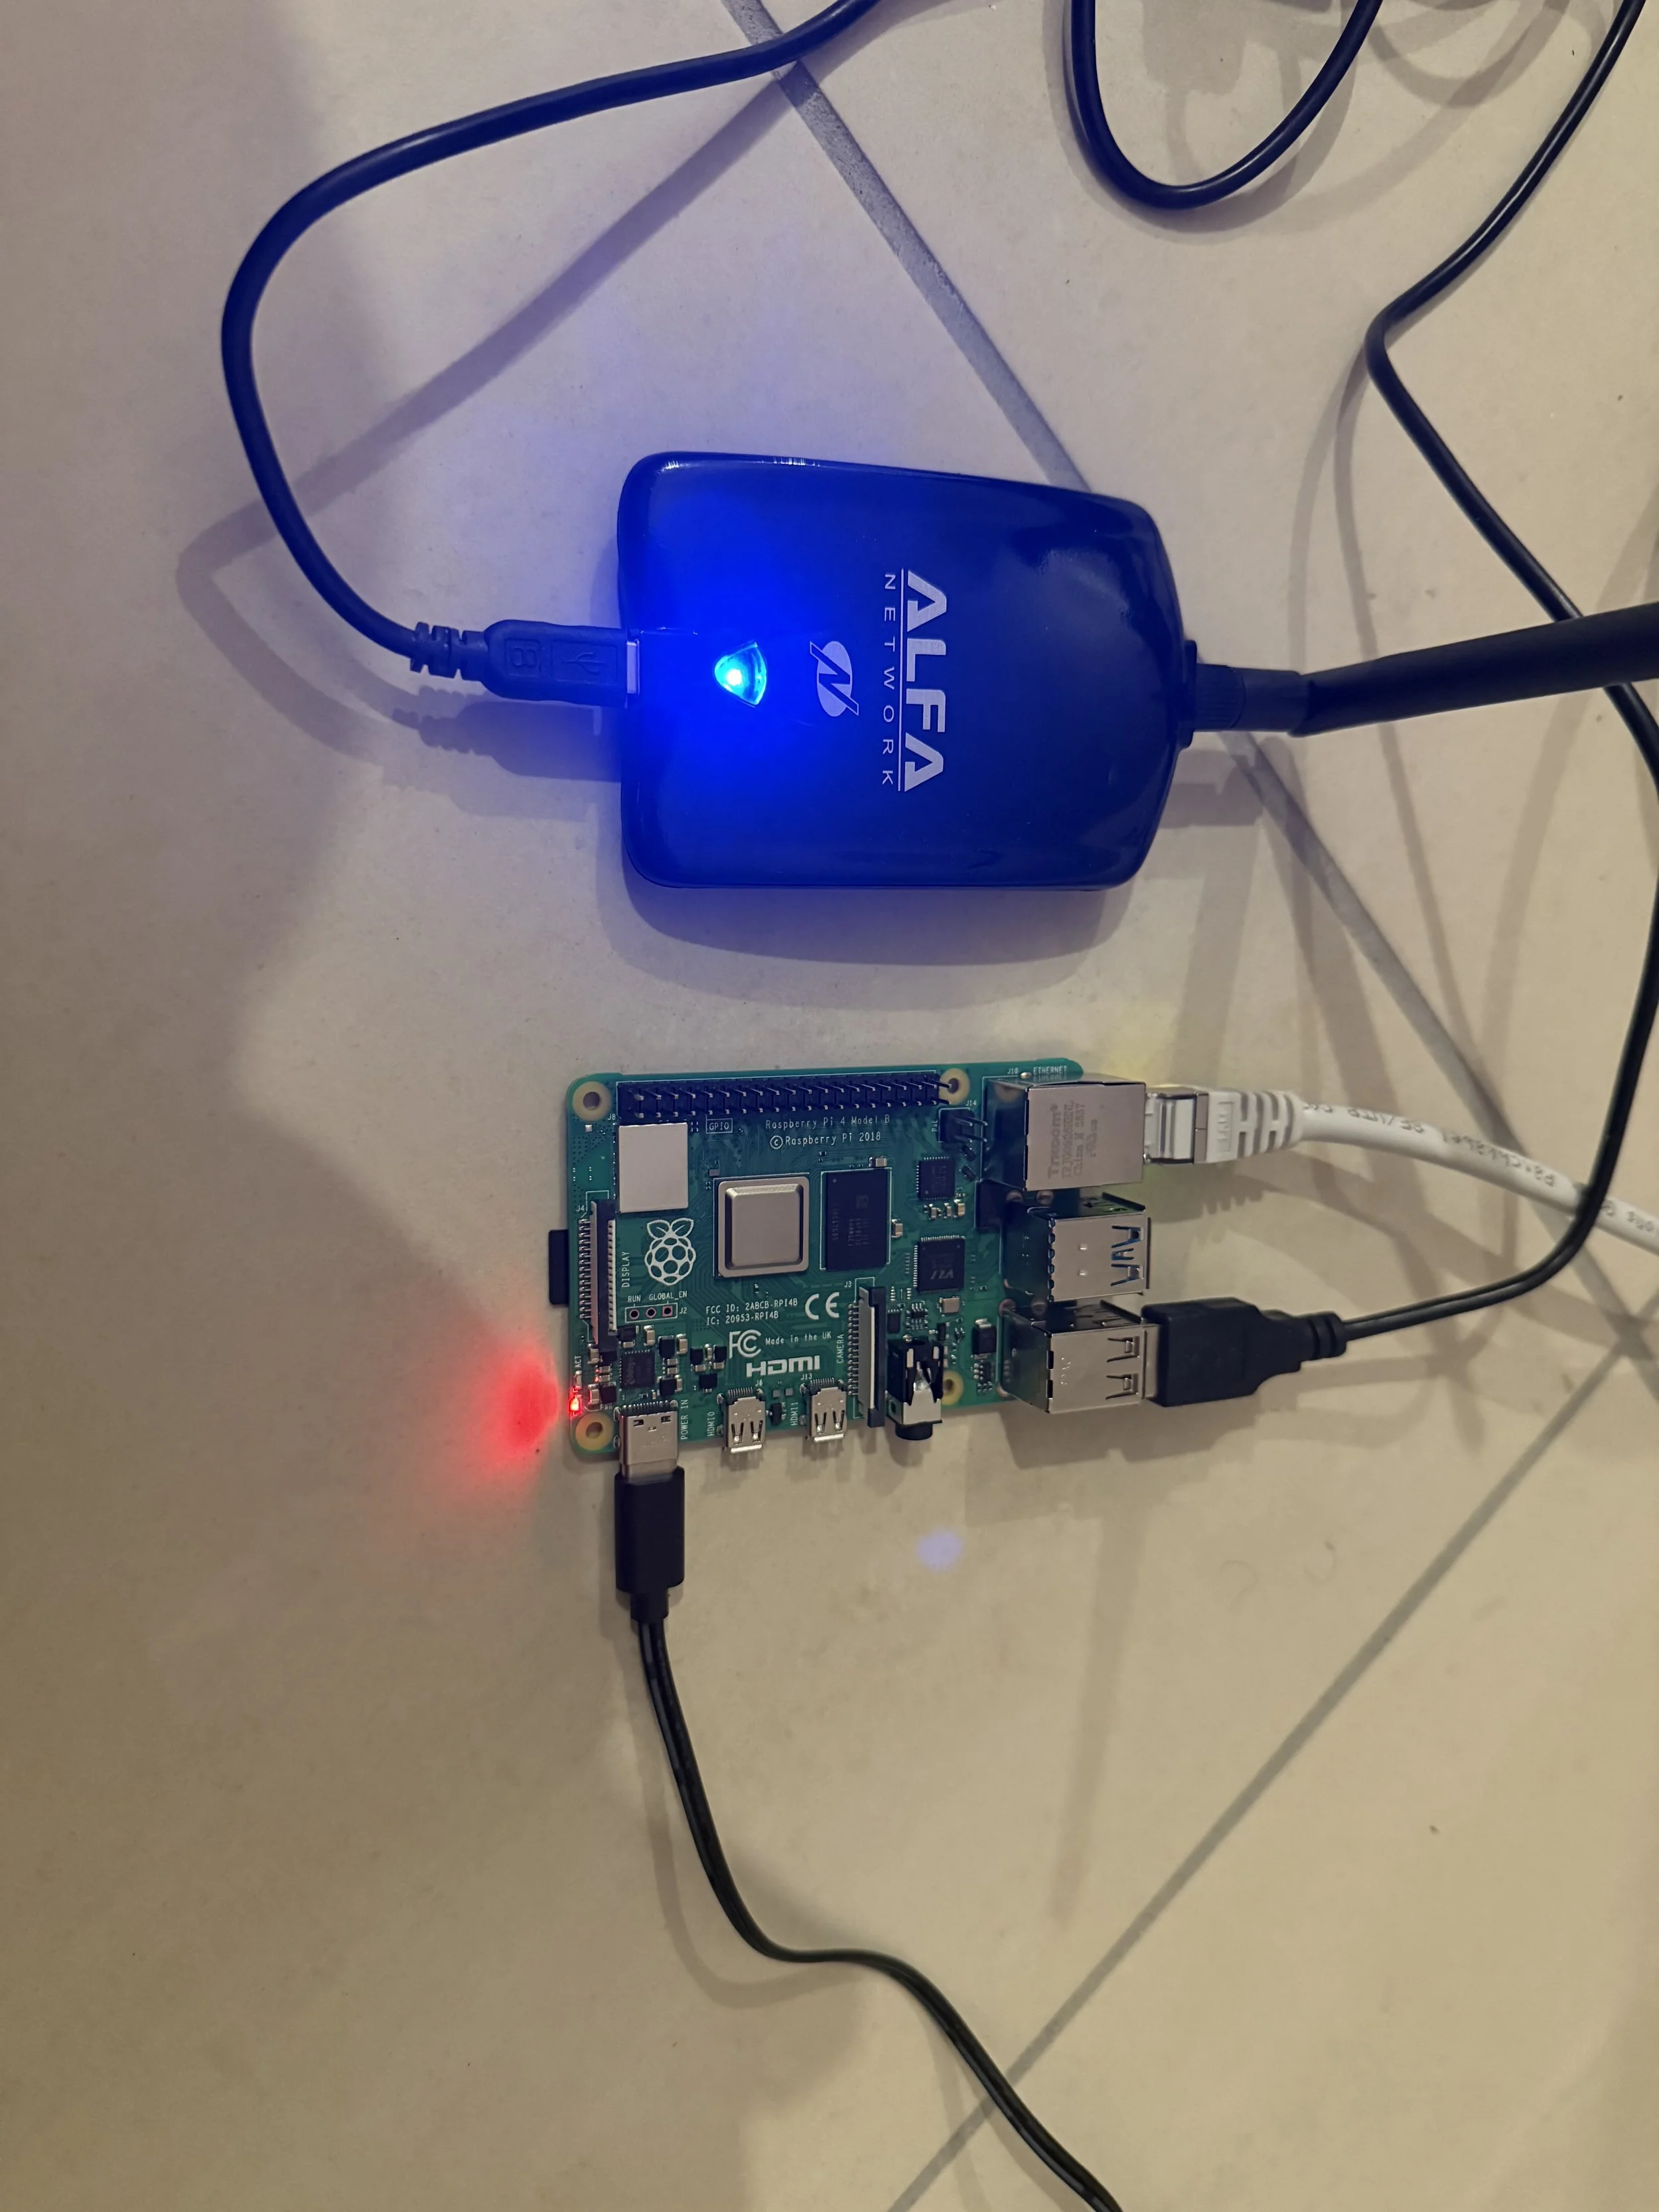
This is the adapter and the router for this project.
This is me using the iPhone to test internet access from the travel router.
When you unplug the adapter from the router and plug it back in, you must open the OpenWrt GUI and manually disable and re-enable the travel adapter’s network interface for it to start working again. Additionally, if you're not actively configuring anything on the OpenWrt router, make sure to close the browser window. If the session expires while the configuration page is left open, the adapter may disconnect as well.


This is how the finished product looks like.
Configuring a Private VPN
This task is yet to be completed!